This time I will share jQuery Plugin and tutorial about Easy Alert Notification Bar Plugin With jQuery – EasyNotif, hope it will help you in programming stack.
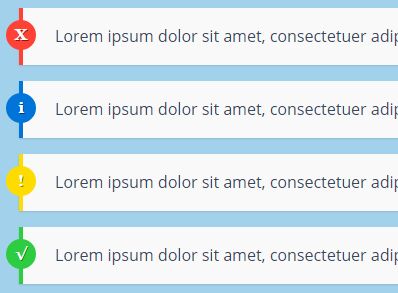
EasyNotif is a really simple jQuery alert plugin which lets you create alert notification bars of various types (default, info, error, warning, success) on the webpage. Click on the notification body to close the notification bars manually.
How to use it:
1. Create a set of notification bars with custom messages as follows:
01 |
<div class="container"> |
03 |
<div class="easy-notif"> |
04 |
Lorem ipsum dolor sit amet, consectetuer adipiscing elit. |
06 |
<div class="easy-notif error"> |
07 |
Lorem ipsum dolor sit amet, consectetuer adipiscing elit. |
10 |
<div class="easy-notif info"> |
11 |
Lorem ipsum dolor sit amet, consectetuer adipiscing elit. |
14 |
<div class="easy-notif warning"> |
15 |
Lorem ipsum dolor sit amet, consectetuer adipiscing elit. |
18 |
<div class="easy-notif success"> |
19 |
Lorem ipsum dolor sit amet, consectetuer adipiscing elit. |
2. Load jQuery library and the jQuery EasyNotif plugin’s script at the bottom of the webpage.
1 |
<script src="//code.jquery.com/jquery.min.js"></script> |
2 |
<script src="js/easynotif.js"></script> |
3. Call the function to display the notification bars on page load.
1 |
$('.container').easynotif(); |
4. You can also create notification bars in the JavaScript as follows:
3 |
content: "Error message" |
5 |
$('.container').easynotif(options); |
5. The default notification styles. Add the following CSS snippets to the webpage and override & modify the styles to your taste.
05 |
padding: 1em 1em 1em 2em; |
06 |
border-left: 4px solid #DDD; |
07 |
box-shadow: 0 1px 1px rgba(0, 0, 0, 0.125); |
16 |
background-color: #DDD; |
25 |
text-shadow: 1px 1px rgba(0, 0, 0, 0.5); |
28 |
.info { border-color: #0074D9; } |
32 |
background-color: #0074D9; |
35 |
.success { border-color: #2ECC40; } |
39 |
background-color: #2ECC40; |
42 |
.warning { border-color: #FFDC00; } |
46 |
background-color: #FFDC00; |
49 |
.error { border-color: #FF4136; } |
53 |
background-color: #FF4136; |
Change log:
2017-02-07
This awesome jQuery plugin is developed by AmineKarismatik. For more Advanced Usages, please check the demo page or visit the official website.


