This time I will share jQuery Plugin and tutorial about Minimal Alert/Confirm Dialog With Custom Tooltip – message.js, hope it will help you in programming stack.

| File Size: | 8.11 KB |
|---|---|
| Views Total: | 563 |
| Last Update: | |
| Publish Date: | |
| Official Website: | Go to website |
| License: | MIT |
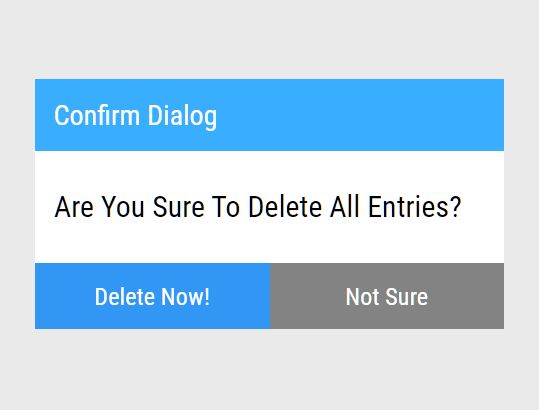
message.js is a small yet customizable jQuery plugin that enables you to display alert and confirmation messages in a custom popup box.
Also includes an option to attach a beautify custom tooltip to any element via data-tooltip attribute.
How to use it:
1. Load the jquery.message.js script after jQuery library and you’re ready to go.
1 |
<script src="/path/to/cdn/jquery.slim.min.js"></script> |
2 |
<script src="/path/to/js/modules/jquery.message.js"></script> |
2. Create an alert popup, define the alert message, customize the OK button, and trigger a function when the user clicks the OK button.
1 |
$.message({ |
2 |
content: "Alert Message", |
3 |
submit: "Confirm" |
4 |
}, function () { |
5 |
// do something |
6 |
}); |
3. Create a confirmation dialog, define the confirm title/message, customize the Confirm/Cancel buttons, and trigger functions when the user clicks the Confirm or Cancel button.
01 |
$.confirm({ |
02 |
title: "Confirm Dialog", |
03 |
content: "Are You Sure?", |
04 |
submit: "Confirm", |
05 |
cancel: "Cancel" |
06 |
}, function(){ |
07 |
alert("submit"); |
08 |
}, function() { |
09 |
alert("cancel"); |
10 |
}) |
4. Attach a custom tooltip to your element.
1 |
<button data-tooltip="<a href="https://www.jqueryscript.net/tooltip/">Tooltip</a> Content Here">Hover Me</button> |
1 |
$.tooltip({ |
2 |
backgroundColor: "rgba(0, 0, 0, .8)", |
3 |
padding: "5px 10px", |
4 |
borderRadius: "8px", |
5 |
color: "#fff", |
6 |
maxWidth: "480px", |
7 |
// more styles here |
8 |
}); |
5. Customize the styles of the alert dialog.
01 |
$.message({ |
02 |
content: "Alert Message", |
03 |
submit: "Confirm", |
04 |
styles: { |
05 |
bg: { |
06 |
backgroundColor: "#eaeaea", |
07 |
position: "fixed", |
08 |
width: "100%", |
09 |
height: "100%" |
10 |
}, |
11 |
wrap: { |
12 |
width: "200px", |
13 |
height: "100px", |
14 |
backgroundColor: "#fff", |
15 |
fontFamily: "Roboto Condensed", |
16 |
border: "#ccc", |
17 |
position: "absolute", |
18 |
left: "50%", |
19 |
top: "50%" |
20 |
}, |
21 |
content: { |
22 |
padding: "10px 10px" |
23 |
}, |
24 |
button: { |
25 |
padding: "8px", |
26 |
fontSize: "13px", |
27 |
textAlign: "center", |
28 |
border: "none", |
29 |
fontFamily: "Roboto Condensed", |
30 |
cursor: "pointer", |
31 |
outline: "none", |
32 |
position: "absolute", |
33 |
right: "10px" |
34 |
}, |
35 |
buttonSubmit: { |
36 |
backgroundColor: "transparent", |
37 |
color: "#000" |
38 |
} |
39 |
} |
40 |
}); |
6. Customize the styles of the confirm dialog.
01 |
$.confirm({ |
02 |
title: "Confirm Dialog", |
03 |
content: "Are You Sure?", |
04 |
submit: "Confirm", |
05 |
cancel: "Cancel", |
06 |
styles: { |
07 |
bg: { |
08 |
backgroundColor: "#eaeaea", |
09 |
position: "fixed", |
10 |
width: "100%", |
11 |
height: "100%" |
12 |
}, |
13 |
wrap: { |
14 |
width: "200px", |
15 |
height: "100px", |
16 |
backgroundColor: "#fff", |
17 |
fontFamily: "Roboto Condensed", |
18 |
border: "#ccc", |
19 |
position: "absolute", |
20 |
left: "50%", |
21 |
top: "50%" |
22 |
}, |
23 |
content: { |
24 |
padding: "10px 10px" |
25 |
}, |
26 |
title: { |
27 |
padding: "10px 10px", |
28 |
backgroundColor: "#39aeff", |
29 |
fontSize: "15px", |
30 |
color: "#fff" |
31 |
}, |
32 |


